All of my cotoneaster shohin bonsai are covered in berries at the moment and looking great. Here are some pictures taken this morning.


All of my cotoneaster shohin bonsai are covered in berries at the moment and looking great. Here are some pictures taken this morning.

This is a Blaauws Juniper that I acquired locally from the family of an enthusiast who had passed away. It was in poor health when I acquired it, having been neglected for several years previously. The following picture shows how it looked when I brought it home in February 2016. A lot of the foliage had died back and what remained had become quite extended, pale and thin. It was re-potted immediately and a feeding programme commenced to try and return the tree to full health. That was two and a half years ago.

The next picture shows how the tree looked at the start of the day. The thin extended branches have been pruned off and the new growth is closer to the trunk line, much healthier and stronger.
The tree is now about 60 cm. tall. It has a long slender trunk line, slowly tapering towards the apex with slight movement to the right. The lower right hand side of the trunk is quite straight and there is a considerable distance between the base of the trunk and the first right hand branch.The nebari is uneven with 1 large, thick root extending to the left; the other radial roots are quite insignificant by comparison.
A relatively thin tree like this will never look its’ best with a full heavy canopy of foliage. Minimalism is what is required here, to make the most of the material.

I have decided that this tree will be developed in the literati style; a style characterised by thin trunks and sparse foliage. Junipers are also enhanced by dramatic areas of deadwood. So the first task was to remove and jin all the branches that would not be critical to the perceived design. Many of the jinned branches were the connected by a shari running the length of the trunk. The following picture demonstrates the start of this stage.

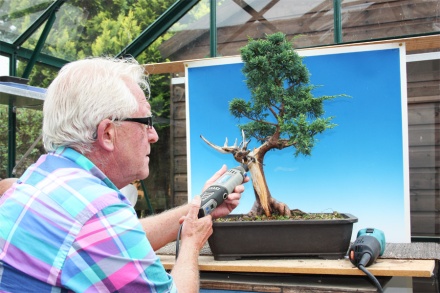
After thinning out the foliage, the remaining branches were wired and bent into position. The next picture shows how the tree looks at the moment. Its quite possible,when I next work on the tree that more branches will be removed to simplify the design even further, but I will leave that decision for another day.
The next major job will be to re-pot and correct the planting angle next year. The next picture is a photo montage showing the tree rehoused in a nice Ian Baillie pot, which I am saving for this purpose.


This is an update on a tree I acquired from good friend Philip Donnelly of Belfast Bonsai. He gave me the tree as a gift at Bonsai Europa 2015 but it was the Summer of 2016 before I could do any work on it.
The tree was full of thick branches, which were at awkward angles to the main trunk; excellent material for jins but no good for foliage pads. All of these were removed in 2016 when the tree was re-potted, leaving 1 single branch, which would provide all the future foliage.. The first picture was taken just after this work was completed.

Jins and a shari were added in 2 stages over the following 12 months.


Over the same period the tree was fed regularly with high nitrogen fertiliser to promote strong growth in the one branch that was retained to form the upper trunk after the chop back of 2016.
Like most trees, the crown tends to grow with more vigour than the other parts, so this area had to be thinned to allow the light to get down to the lower branches. You can see this in the next picture, which was taken this morning before foliage thining and wiring commenced.

This is how it looks at moment after thinning and wiring the branches into position. It will be a few more years before the foliage pads have filled out and fully developed but for now, it’s easier to visualise where I intend to take this tree in the future
Activating research on a monastic landscape
Shop for quality bonsai
Brian's Bonsai Blog
bonsai and garden
Art and Adventure - Collecting Rocky Mountain Yamadori
Bonsai Revival Journey
my bonsai
My Bonsai adventure - Moja przygoda z bonsai
Welcome to Sussex Bonsai Group
Welsh Bonsai Trees- Inspired by local naturalised trees. Promoting Great Bonsai across Wales.
Fun things I see and do in my bonsai life.
Alpines, rock garden plants, Alpine Garden Society, Scottish Rock Garden Club
Welcome To My Bonsai World!
Bonsai Adventures
Developing bonsai trees from scratch
My on-line Bonsai Diary
Bonsai, penjing, kusamono, suiseki and viewing stones
Bonsai from Pennsylvania and beyond :)
Updates from Willowbog Farm
Bonsai Artist and Instructor
Teaching & Promoting Bonsai in Ireland
recycled art, bonsai, botanical modelmaker, natural history exhibits
A Novice Bonsai journey in Ireland
Where to start. Where to go.
My Life in Bonsai and Ancient trees
New Post on Crataegus Bonsai
Great Bonsai Containers
