New Spring Growth

Spring is still in its early days here in Scotland, but the slight increase in light and temperature are having the desired effect. Here are some pictures of trees that are beginning to shine at the moment.

Larches are at their best as the new growth emerges.

a1

My acer Shishishigira is well ahead of my other maples.

a2

This Japanese black pine is beginning to respond and the foliage is taking on a richer glow.

a3

This little prunus is well ahead of the others on my benches.

Untitled-1

More Trees in Flower

It’s not every year I get flowers on my Japanese larches

f1

This Chojubai has had flower buds since October but It’s only now that they are beginning to open

f2

A sign of better days to come

2 Acers in Development. Re-potted Today

Here are 2 Acer Palmatum trees that I have been developing for a couple of years. They were put into their first bonsai pots today.

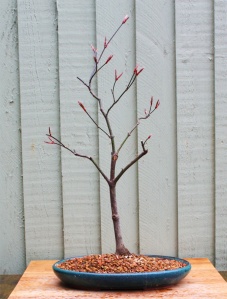
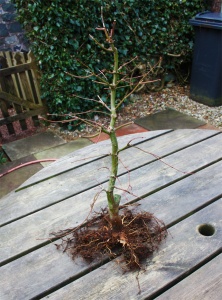
The first one was air layered from a larger tree 2 years ago. As you can see in the first picture, it has a strong evenly distributed root system and a nice flared  nebari is beginning to emerge. When the air layer was cut, the trunk above the cut was exactly the same thickness as the trunk below the cut. So the flaring at the base has developed in the past two years. I think this is very encouraging for the future development of this tree.

m4

To allow the continued development of the roots, it was planted today into this large shallow oval.

m2

This is the tree that the air layer was taken from.

maple

The next tree was planted in a large garden pot for a while to thicken up the base of the trunk and promote rapid root development. Large sacrifice branches were allowed to grow unchecked.

map2

The roots of the tree had filled this large container by the time the sacrifice branches were cut last autumn.

map4

Today it was removed from the large pot and the roots were trimmed back severely.

m3

The trunk was chopped back and the tree planted into another shallow oval bonsai pot.

m1

Both these trees have some way to go before they become bonsai but it will be interesting to see how they continue to develop in the future. The plan for the coming year is to feed them profusely and re-evaluate their progress at the end of the season.

First Flowers of the Year

The Flowers on my Prunus kojo no mai have reached a peak today, as if to mark the first anniversary of my blog. Yes, it was one year ago this week that I began my blogging journey. I have had over 55,000 page views in the first year, which I think is amazing for a blog that focuses on a minority interest within a minority interest. I would like to thank everybody that have taken the time to view my efforts, it’s you guys that make it all worthwhile.

cherry

Re-potting My Deciduous Shohin Trees

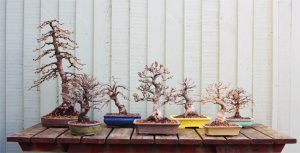
I take all of my more established deciduous shohin trees out of their pots each spring, not necessarily because they need to be re-potted but mainly to check the condition of the soil and roots. I find that the top centimetre of soil in the pot breaks down quite quickly in our climate, and retains too much moisture. This does nothing for the tree, but does provide the ideal conditions for mosses, liverworts and insect larvae. I clean the decayed soil off, trim the roots if necessary and replace the tree in it’s pot with some fresh akadama and kiryu.

Here are some pictures of the trees that were re-potted today

r1

This cork barked elm needed the roots trimmed a little

r2

The roots on this trident were OK but the top layer of soil needed to be replaced

r4

Cleaned up and ready to go back in the pot

r5

This Shishishigira got the same treatment as the trident

r6

Potted up and good to go for another year

r3

Trident Maple Project

3 years ago, I bought a small forest planting of trident maples. I intended to separate them into individual pots, which I would then grow on to create my own shohin sized material.

The foreground of the first picture shows the saplings sitting on my benches, freshly separated and potted into 5 inch training pots, in the summer of 2012.

t7

In the 2 and a half seasons that have past since the fist picture was taken, most of these trees have done very well. They all are considerably larger than they were at the start and are now ready for their third re-pot.

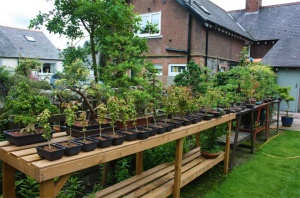
The next picture shows the three largest trees in the group earlier today. The roots are now filling the 12 inch wide pots and the trees are now ready to be planted into larger growing boxes. The oval pot in the foreground contained all of the saplings in 2012.

t1

The shallow growing boxes are quickly made from any spare timber I have in the garden. Their purpose is to assist in the development of a good nebari by providing plenty of room for the lateral spread of the roots.

t2

The first tree is tied into  box which will house the roots for the next few years

t3

2 Done, 8 more to go. The trees will stay in these boxes for a few years until I am happy with the thickness of the trunk and the root spread, at their base. At that point, the tops will be air layered off about 4 inches above the soil level and the work of creating shohin tridents can begin.

t4

At the moment these trees have a thickness of 1 and a half inches at the soil level

t5

t6


Repotting and Restyling Some Trees with a Friend

I paid a visit to my friend Gerry’s garden today to help him get started with the seasonal work on his trees. Here are a few pictures of some of the trees that we worked on.

The first to be tackled was this tall larch.

g1

I gave this tree to Gerry about a year ago because I felt that it would provide quite a few challenges for someone that’s new to the hobby. It’s quite a tall tree (36 inches high), it has a straight untapered trunk and the nebari needs a lot of work also.

g2

After some discussion on the pros and cons of the material, we decided that we would first remove the tree from the pot and do what we could to improve the poor nebari. We discovered that the base of the trunk had sufficient roots to allow us to remove the large thick root which protruded to the rear. The removal of the soil also revealed a bend at the base of the trunk, which could be used to introduce movement into the otherwise straight trunk.

This is how the rear of the trunk looked, when the work was completed. Quite an improvement I think.

g3

The other major problem that this tree had, was the long straight trunk without taper. To deal with this, we decided to chop the tree back to the 2 lowest branches and wired one up to form a new apex and upper trunk.

This is how it looks from the front, at the moment. The chop can be carved into profile at a later time.

g4

This little deshojo maple, which was imported from Japan last year, needed a slight change of angle and a coarser grade of soil to suit the Scottish climate

Before

g5

After

g6

This variegated elm, which also came from Japan last year was pot bound and required substantial root reduction

g7

A new pot and a simplified trunk line. This pot is a little larger than it needs but will allow the roots to spread and speed up the development of the branch structure

g8

Reworking Some Larches

I have quite a number of larches that I have collected over the years that I have never been entirely happy with and which have consequently spent most of their lives out of sight at the back of my garden. The reason for this is that they all suffer from a lack of movement and taper in the trunks. Taper and movement in the trunk are, in my view, two of the most important attributes of a good bonsai. Recently, I have been looking at those trees again, with a view to considering what can be done to improve them.

This tree is a typical example. The first picture was taken in 2012. There is a little movement in this trunk and the taper is almost imperceptible. This type of tree can be quite useful as part of a forest planting but on its own it has little to recommend it. Last year, in an attempt to add interest and improve this tree, I chopped it back to two of the lowest branches and wired one to form a new apex.

l3a

This is how it looks today, one year on from the work described above. I think it looks better already and it should get better in the coming years.

l3

Here is another, more extreme example, which was cut back today

Before

l1

After, with a re-pot and a slight change of angle

l2

And here are a couple of small trees, which were also cut back today

l5

l4

Spring has arrived. Well, almost!

We are still getting quite hard frosts at night but the daytime temperatures here in Scotland have risen considerably in the last week. In the past few days, some off my trees have had their first airing outside the greenhouse in five months.

Here’s a few of my cotoneasters enjoying a few hours in the rejuvenating spring rain. The berries will be removed and top layer of soil will be refreshed in the next few days. We are getting very close to the time when the annual rush of spring activity will begin and all those jobs which have been accumulating over the winter will have to be tackled to get our trees ready for the new season.

sp1

I started my re-potting today. This Potentilla was the first to be done. It has been in this pot for two seasons and it was quite difficult to extract it. Most of the roots were on the outside of the rootball. The interior was very dry and did not have many roots at all. I cut the roots back by about half and re-planted it in the same pot with some fresh soil.

sp2

sp3

sp4

I also selected and wired the branches I want to keep on my small hawthorns

sp6

sp7

And so the cycle begins again.